Normally,
when we want to create a Java project or plugin, we use wizards of IDE as
Eclipse or Netbeans to do it easily. However, in some cases we want to do it
programmatically. On this article, I will show you a
way to convert a Java Project to a Java Plugin by code. After that, I will
contribute a menu item to a popup menu, for example the popup menu of the
genmodel’s editor.
I also will add comments on lines of code so
you could easy to understand it.
Environment
I use Eclipse 4.2 (Juno) and Jdk 6 on Window
platform to illustrate. You at least need to know about Eclipse plugins and
Eclipse commands. You could learn these topics on the Vogella blog (see more on
references).
Create a plugin
First of all, we create a plugin by choosing
File à
New à
Other à
Plugin Project
Set the project name to de.rwth.swc.demo.generation, and hit Next and Finish (keep
everything as default).
Open the Manifest file, choose the
Dependencies tab then add two more plugins:
- org.eclipse.jdt.core
- org.eclipse.core.resources
The next step is to create a command and a
menu contribution:
- Open the Extension tab, add org.eclipse.ui.commands and org.eclipse.ui.menu.
- Right click on org.eclipse.ui.commands, choose New
-> Command.
- Set the id is de.rwth.swc.demo.generation.test
and the name is test.
- Set de.rwth.swc.demo.generation.MenuHandler for defaultHandler, then click on the hyperlink of defaulHandler. It will create a class MenuHandler
on package de.rwth.swc.demo.generation. We will comeback with this class on the
next part.
- Right click on org.eclipse.ui.menu, choose New ->
menuContribution.
- Set popup:org.eclipse.emf.codegen.ecore.genmodel.presentation.GenModelEditorID
to locationURI. To understand why we
could know this URI, please look on the appendix part.
- Right click on the
menuContribution created on the previous step, New à
Command. Set de.rwth.swc.demo.generation.test
to the commandId field and set Create a Plugin for the label.
After these steps, we will have the
Extensions tab as below:
When you run this plugin, assume that you
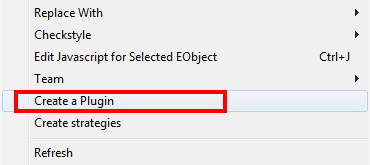
have a genmodel file, the popup menu should include a menu item, named Create a Plugin as below:
Work with the Handler class
Now is time to work with the handler class
which will perform the back end of the menu item. Open the MenuHandler class,
we could see that it implements the IHandler interface. However, on this
article we just work with the execute() method, so we change a bit, let the
MenuHandler class extends AbstractHandler class and we will have the original
code:
package
de.rwth.swc.demo.generation;
import
org.eclipse.core.commands.AbstractHandler;
import
org.eclipse.core.commands.ExecutionEvent;
import
org.eclipse.core.commands.ExecutionException;
public class
MenuHandler extends AbstractHandler {
@Override
public Object
execute(ExecutionEvent event) throws ExecutionException {
return null;
}
}
To achieve our purpose in the beginning, I
will do some steps as below:
- Create a Java project.
- Set JavaNature feature for
the project
- Set JRE path
- Create the bin folder and
set as the output folder
- Create a source folder (if
you want to create Java classes)
- Convert the Java project to
become a Java plugin.
Create a Java project.
We add three attributes for the handler class:
//
Snipped…
private
IProject project;
private
IJavaProject javaProject;
private final String PROJECT_NAME = "de.rwth.mocca.demo.test";
// Snipped…
Add a new method, createProject() as below:
private void
createProject() throws CoreException {
//
Create a progress monitor.
IProgressMonitor
progressMonitor = new NullProgressMonitor();
//
Get the workspace of Eclipse.
IWorkspaceRoot
root = ResourcesPlugin.getWorkspace().getRoot();
//
Get a project by its name but hasn't created a real project.
project =
root.getProject(PROJECT_NAME);
//
Create a new project.
project.create(progressMonitor);
//
Open the project.
project.open(progressMonitor);
//
Convert the project to a java project.
javaProject =
JavaCore.create(project);
}
Set JavaNature feature for the project
Even we convert the project to become a java project, but we
need to set the Java nature or feature for this project. We create a new
method, setJavaNature() as below:
private void
setJavaNature() throws CoreException {
//
Get the description of the project
IProjectDescription
description = project.getDescription();
//
Change the description with NATURE_ID of JavaCore
description.setNatureIds(new
String[] {JavaCore.NATURE_ID});
//
Set the description back to the project
project.setDescription(
description,
null);
}
JavaCore is a class on the org.eclipse.jdt.core plugin. It
includes many constants as CORE*, FORMATTER*, COMPILER*, etc. Two important
contants are NATURE_ID and PLUGIN_ID.
Set JRE path
A Java project needs to have a JRE path. We add a method,
addDefaultJRE to do this task:
private void
addDefaultJRE(IProgressMonitor progressMonitor) throws
JavaModelException {
//
Create an empty class path entry array for the project
javaProject.setRawClasspath(
new
IClasspathEntry[0], progressMonitor);
//
Get it - the old entries
IClasspathEntry[]
oldEntries = javaProject.getRawClasspath();
//
Increase 1 for the size of the new entry array.
IClasspathEntry[]
newEntries = new IClasspathEntry[oldEntries.length + 1];
//
Copy the old entries to new entry array.
System.arraycopy(
oldEntries,
0, newEntries, 0, oldEntries.length);
//
Set the new element to the default JRE of the system.
newEntries[oldEntries.length] = JavaRuntime.getDefaultJREContainerEntry();
//
Set back entry paths to the project
javaProject.setRawClasspath(
newEntries,
progressMonitor);
}
The JavaRuntime class is not available on our plugin at this
moment. It belongs to org.eclipse.jdt.launching so we need to add it as a
dependency of the de.rwth.swc.demo.generation
plugin. JavaRuntime offers some methods to work not only with JRE but also with
Virtual Machine.
Create the bin folder
We need to add a bin folder and set it to become the output
location (the folder keeps class files) for the project: create a new method,
createBinFolder(), as below:
private
IFolder createBinFolder() throws
CoreException {
//
Get the folder with the name bin
IFolder binFolder = project.getFolder("bin");
//
Create this folder. if the first parameter is false, it does not
//
forced to override the folder
binFolder.create(
false, true, null);
//
Get the path of the bin folder
IPath
outputLocation = binFolder.getFullPath();
//
Set that path as the output location of the project
javaProject.setOutputLocation(
outputLocation,
null);
return
binFolder;
}
Create a source folder (if you want to create Java classes)
Now we will create a source folder to keep the java files.
We will do the same way to create the bin folder: create a folder, then add to
class path of new project. The code is enclosed on the createSourceFolder method:
private
IPackageFragmentRoot createSourceFolder(String srcName) throws
CoreException {
//
Get the folder with srcName name. It may be not exist
IFolder
folder = project.getFolder(srcName);
//
Create a real folder. In the case you want to force override the
//
folder,
//
set the first parameter as true
folder.create(
false, true, null);
//
Get the source folder as root package
IPackageFragmentRoot
root = javaProject.getPackageFragmentRoot(folder);
// Do
the samething on the addDefaultJRE method
IClasspathEntry[]
oldEntries = javaProject.getRawClasspath();
IClasspathEntry[]
newEntries = new IClasspathEntry[oldEntries.length + 1];
System.arraycopy(
oldEntries,
0, newEntries, 0, oldEntries.length);
//
Add a new source folder as a new entry for class paths
newEntries[oldEntries.length] =
JavaCore.newSourceEntry(root.getPath());
//
Set back entry paths to the project
javaProject.setRawClasspath(
newEntries,
null);
return root;
}
Convert the Java project to become a Java plugin.
We use a class of Eclipse to do this task. Firstly, we
import the source code of the plugin named org.eclipse.pde.ui. We copy class
org.eclipse.pde.internal.ui.wizards.tools.ConvertProjectToPluginOperation to
the de.rwth.demo.generation package. (The reason why we know the plugin and the
class, you could see on the Appendix part. After copying, there are some errors
on this class. To fix those errors, we need some other plugins and import some
packages:
- Add dependencies: org.eclipse.pde.core and
org.eclipse.pde.
- Import packages: org.eclipse.pde.internal.ui,
org.eclipse.pde.internal.ui.util, org.eclipse.ui.actions,
org.eclipse.pde.internal.ui.wizards.tools.
On this class, we will call the execute(…) method to start
converting projects.
The last step
Now we change the createProject() a little bit. We call the
methods created above:
setJavaNature();
//
Add JRE
addDefaultJRE(progressMonitor);
//
Create the bin folder
createBinFolder();
//
Create a source folder
IPackageFragmentRoot
src = createSourceFolder("src");
//
Convert the project to a plugin
ConvertProjectToPluginOperation
convert = new ConvertProjectToPluginOperation(new
IProject[] {project}, true);
try {
convert.execute(progressMonitor);
}catch
(InvocationTargetException e) {
e.printStackTrace();
}catch
(InterruptedException e) {
e.printStackTrace();
}
On the execute() method of MenuHandler, we call the method
createProject() and everything is done.
Running
You could export the de.rwth.swc.demo.generation
plugin and import to your Eclipse if you want. However, here I will run
directly this plugin and create a new instance of Eclipse.
Right click on the manifest file and run as Eclipse
application. Assume that you have a genmodel file or something like ecore file,
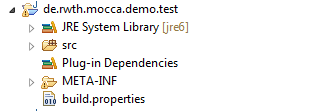
right click and choose Create a Plugin, you will get a new plugin with the name
de.rwth.mocca.demo.test.
Appendix
Question: How
could I know to set popup:org.eclipse.emf.codegen.ecore.genmodel.presentation.GenModelEditorID
to the locationURI field?.
Answer:
Open one genmodel file, and press Shift + Alt + F2 to spy the popup menu
We will see that the class take
care this operation is GenModelActionBarContributor$GenerateAction on the
plugin org.eclipse.emf.codegen.ecore.ui. Import the source code of this plugin,
open the manifest file, then the Extensions tab, you could see the ID of EMF
Generator is the value which is set for the locationURI field.
Question: How could I know the ConvertProjectToPluginOperation
class?
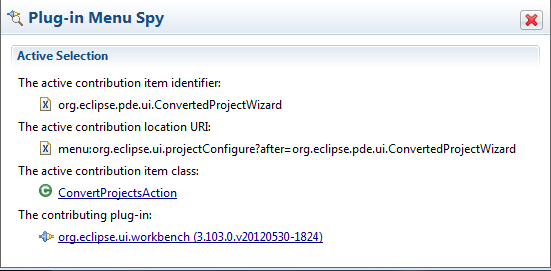
Answer: By using spy key code (Shift + Alt + F1), we could check
what class has responsible to convert projects. Right click on a Java project,
choose Configure -- > Convert to Plug-in Projects, we have:
By importing the plugin
org.eclipse.ui.workench (we need to switch to the plug-in perspective) and the
open ConvertProjectAction class, you will find on performFinish() methods
leading to the ConvertProjectToPluginOperation class.
References
There are some links that you could read related to this
article:
Eclipse Plugin: http://www.vogella.com/articles/EclipsePlugIn/article.html
JDT: